In this tutorial, I am going to show you how to create a website with WordPress – no coding or programming knowledge required.
Whether you want to create a blog, a business website, an online store or a professional portfolio, this step-by-step tutorial will teach you exactly how.
This WordPress tutorial is aimed at the absolute beginner.
- Introduction to WordPress
- Why WordPress?
- Checklist for Creating a WordPress Website
- Web Hosting and Domain Registration
- Your Client Area
- Managing Your Hosting Package
- Installing/Activating an SSL Certificate
- Installing WordPress
- Your WordPress Admin Dashboard
- WordPress Admin Settings
- Installing a Theme
- Working with Pages
- Working with Posts
- Creating Your Site Menu
- Customizing Your Theme
- Designing Site Pages
- Installing Plugins
- Optimizing Your Website for Search Engines
- Creating an Online Store
- Configuring Your Store
- Integrating a Payment Gateway
- Adding Products Creating Variable Products
Introduction to WordPress
WordPress is a powerful content management system (CMS) used to create beautiful blogs and stunning websites. You can create any kind of blog or website with WordPress, even if you can’t write code or know any programming language.
WordPress alone powers about 40% of all websites on the internet. It is a drag-and-drop system, which means anyone – yes, even you – can use it to build a blog or website completely without writing any code.
It doesn’t matter if you are a complete newbie. I was once like you just a few years ago. But today, I make a living from building WordPress websites for myself and clients.
Why WordPress?
Here’s why WordPress is the most popular website creation tool and content management system (CMS).
- Ease of use: WordPress is an incredibly easy-to-use platform. Even newbies without coding or technical knowledge can create websites with WordPress.
- Large community of developers and support: WordPress powers about 40% of the web. It has a huge community with an active forum for support. You can join in the forums and get support for any problems encountered and also make contributions when you can.
- Open-source: WordPress.org is an open-source software, which means it is free to use by all.
- Search engine friendly: Out of the box, WordPress has been optimized to be search engine friendly. This means your content is more likely to rank higher on search engines like Google, so people can find your site.
- Thousands of free plugins and themes: WordPress has thousands of free themes and plugins. Of course, who doesn’t love free stuff? As a beginner, you can set up your website design and add functionality to it with these free themes and plugins. When you feel the need to step up to the next level, you can then go premium. But then, buying premium themes and plugins is totally optional.
There are a whole lot of other benefits that WordPress brings to your website or blog.
Now let’s dive into the nitty-gritty of creating a website with WordPress.
Checklist for Creating a WordPress Website
Basically, you need only two things to make a website with WordPress: a domain and web hosting.
Domain
In simple terms, a domain is your unique web address, that is the address that takes people to your website.
Example: celestinedavids.com, destinali.com, etc. Domains typically consist of a name and an extension such as .com, .org, .ng, .com.ng, .edu, .io, .club, and so on and so forth.
When you are just starting out, choose a top level domain such as yourbusiness.com, yourdomain.net, or yourname.org depending on the purpose of your website.
When choosing a domain name, keep it short and easy to remember. Your domain should reflect your brand or business.
Avoid hyphens in between domain names, e.g. instead of my-name.com, choose myname.com; it looks more professional and resonates better with your website visitors.
Generally, .com domains are used for business purposes, .net for networking and .org for non-profit organizations.
Web Hosting
Web hosting is the server where all your your website files (e.g. posts, pages, forms, databases, etc.) are stored so they can be made accessible on the internet.
When choosing a web hosting service, there are four major factors to consider:
- Reliability: You want a web hosting company that is reliable enough to guarantee you 99.99% uptime 24/7. Every downtime to your website is going to impact on you negatively and cause you to lose money. That’s an experience you don’t need.
- Speed: The web hosting server should have top notch infrastructure with well optimized software that guarantee the speed of your website.
- Support: Whether you’re a beginner or a pro, you need someone to talk to and get help readily whenever you’re stuck.
- Backup and Restore: A hosting service should offer you an easy way to backup and restore your website.
- Cost: Cost is obviously something you are going to consider when choosing a web hosting company. You don’t want to pay crazy hosting fees monthly.
Taking the above factors into consideration, the obvious choice here is Kobopress.
Kobopress is a powerful web hosting company that offers reliability, excellent speed, amazing support, backup/restore, and is both pocket and beginner friendly.
With Kobopress, anyone can create a hosting account for just $1 and start building their website even before registering a domain. Kobopress will generate a temporary domain for you to get started. You can always register a domain later and connect it to your site when you are ready.
Web Hosting and Domain Registration
It’s time to get started with web hosting and domain registration:
1. Visit kobopress.com and create an account
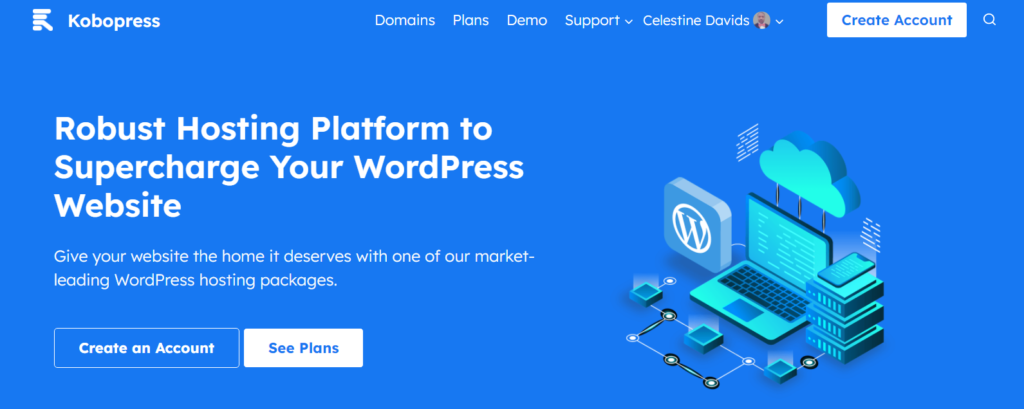
2. Click “create an account” on the account sign-up page
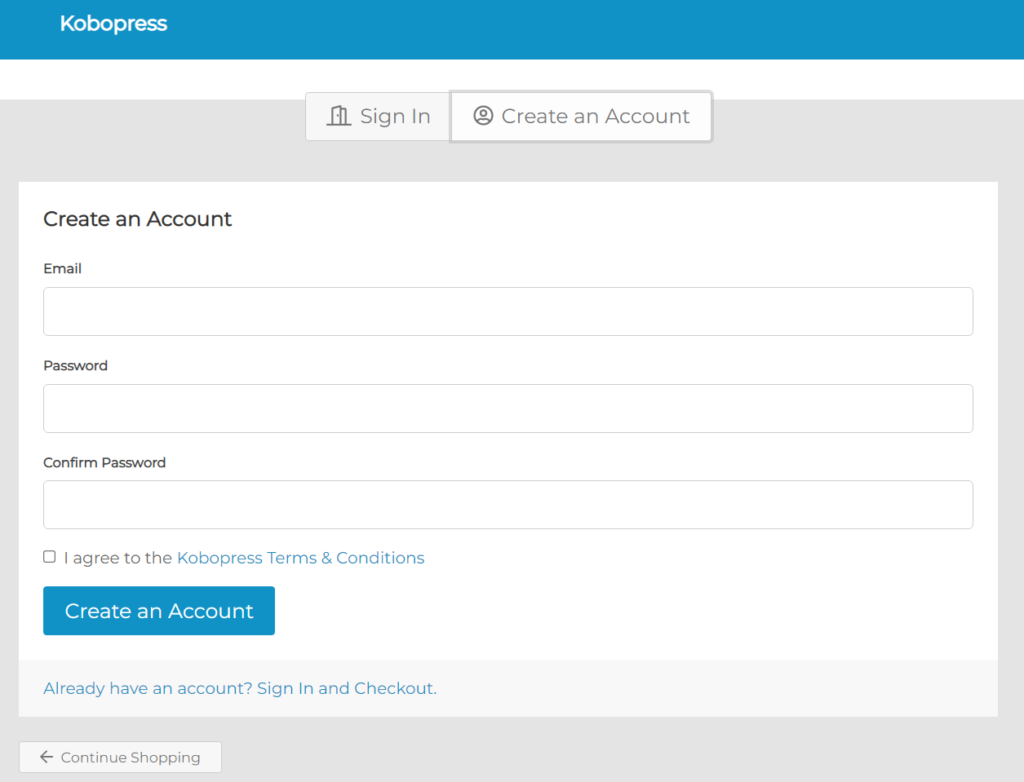
Enter an active email address with a strong password (your password must contain at least a CAPITAL LETTER, a number (e.g. 19) and a special character ($, @, &, %, #, etc.).
Then, confirm your password, agree to the terms and conditions and click Create an Account.
3. Verify your email address (a verification email is sent to you when you create your Kobopress account. Click the link inside that email to confirm your email address)
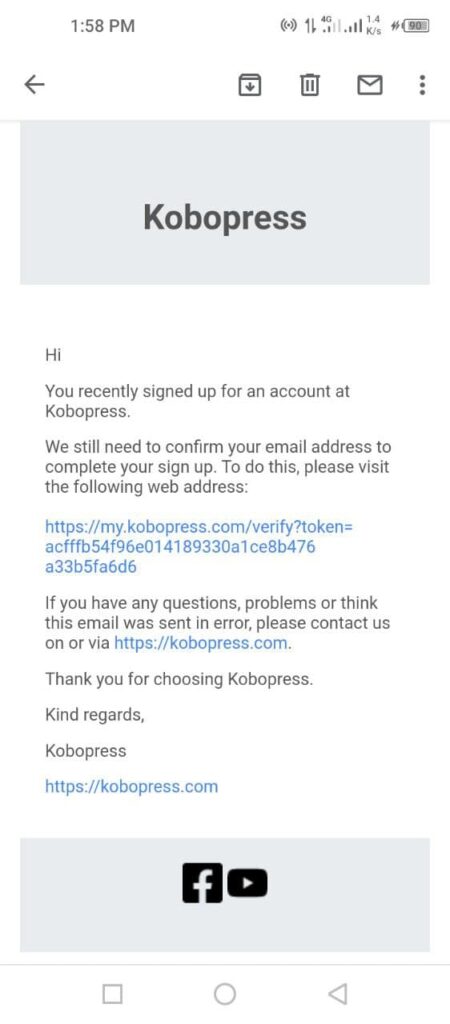
4. Complete your account registration – finish setting up your hosting account by complete the following fields as appropriate:
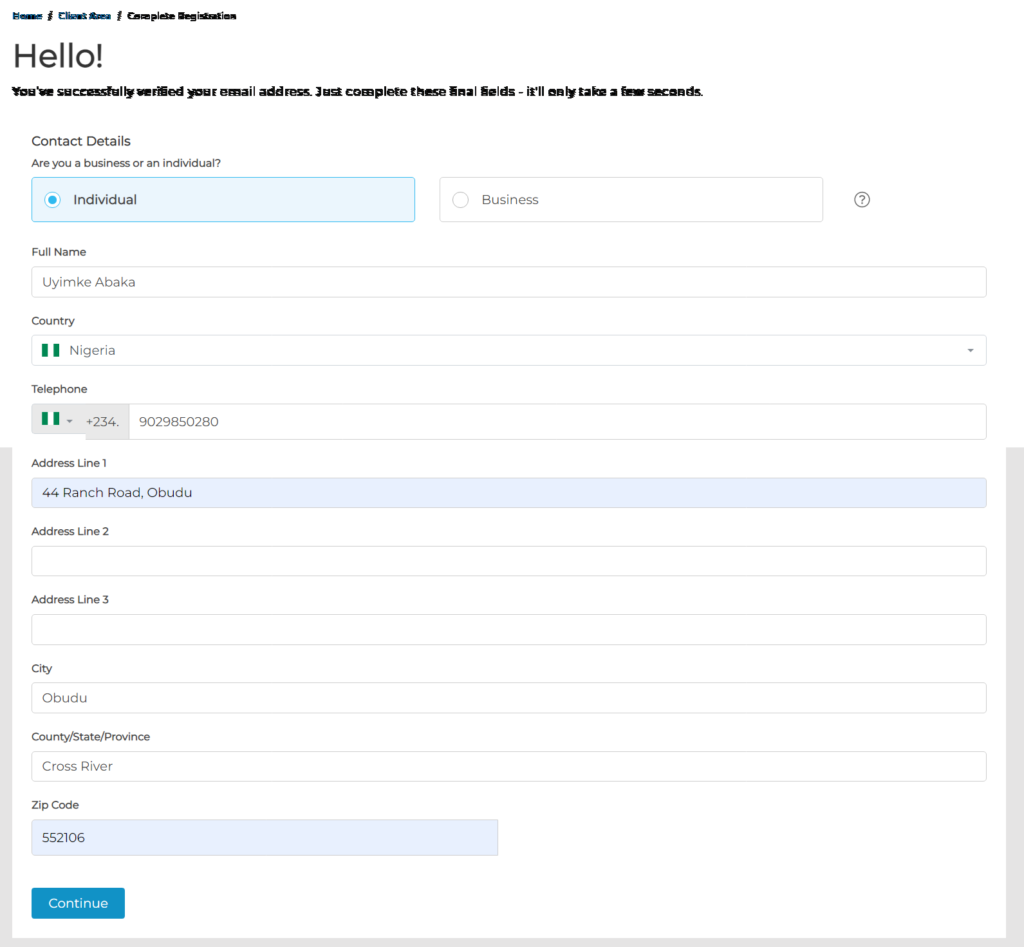
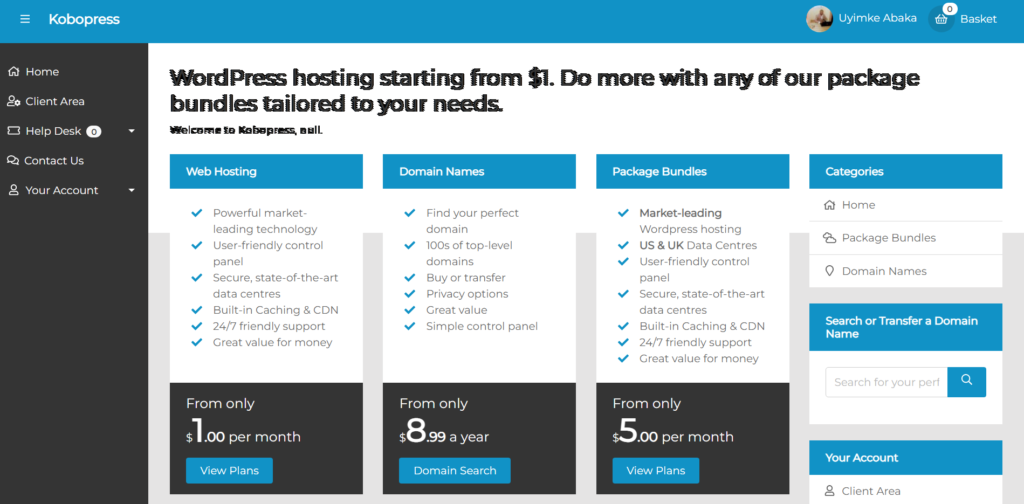
Once the account creation process is complete, you will be redirected to your control panel homepage where you can purchase web hosting. You can always go to your control panel home by visiting my.kobopress.com.
5. Now under Web Hosting tab, click the View Plans Button below it:
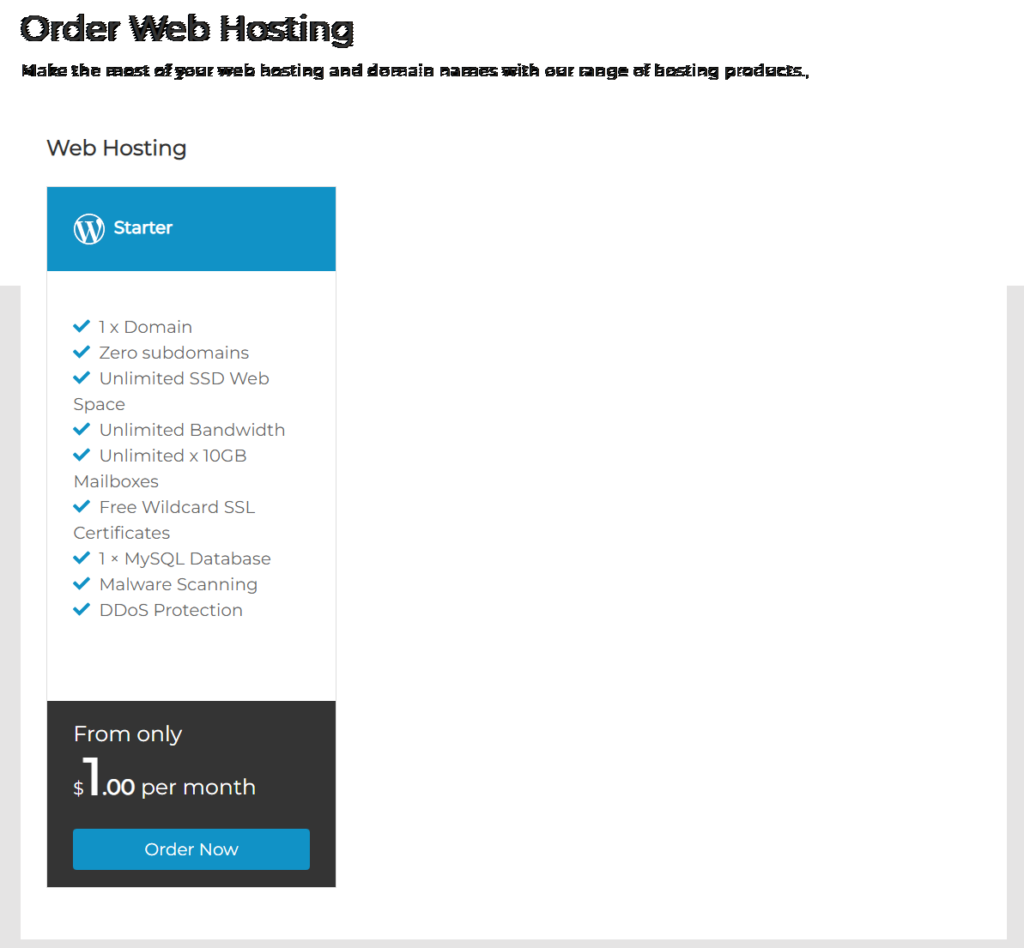
Next, click Order Now button to purchase your web hosting (for $1/month only):
6. Next is to add a domain to your web hosting package:
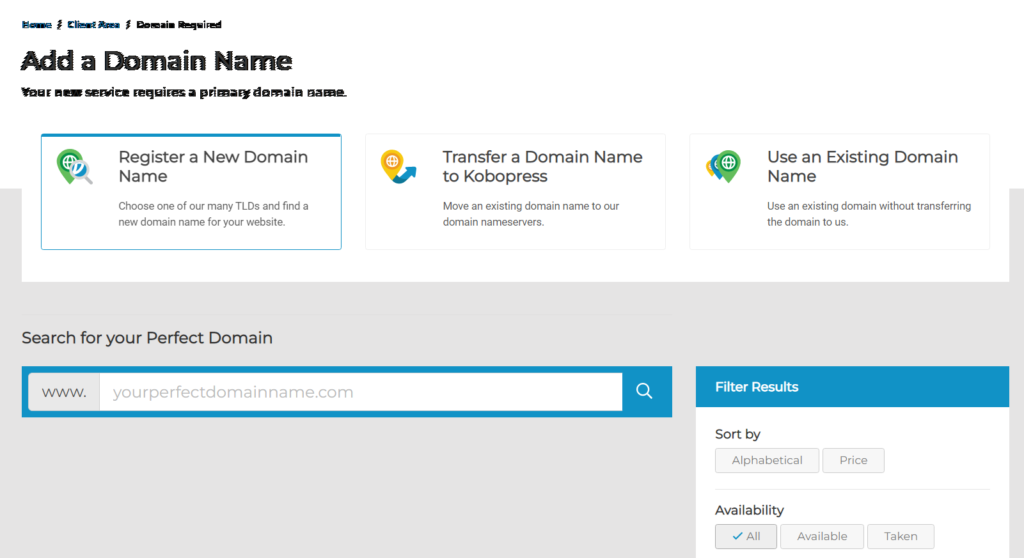
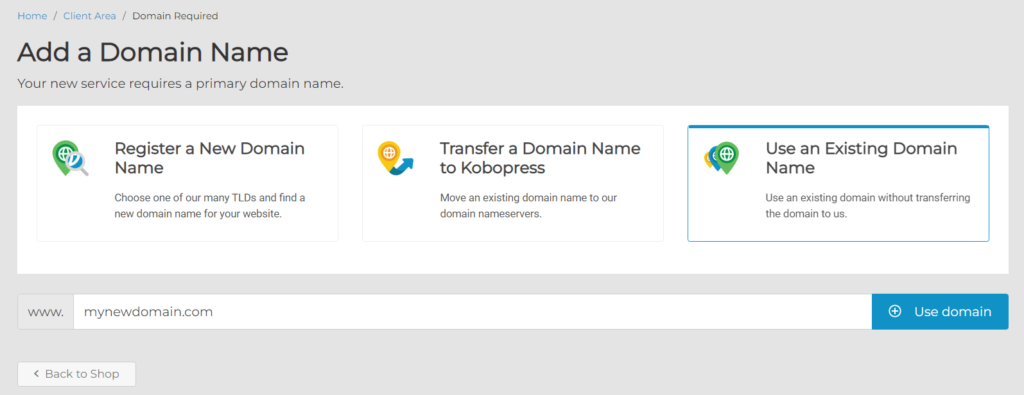
Here, you have three options:
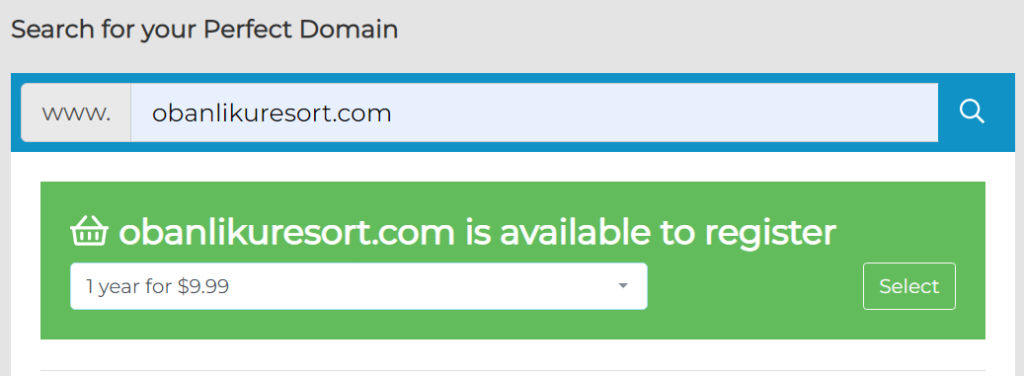
Register a New Domain Name: If you choose this option, you can search for a domain using the search box below and register it with Kobopress.
If the domain is available, you can select the registration length to proceed:
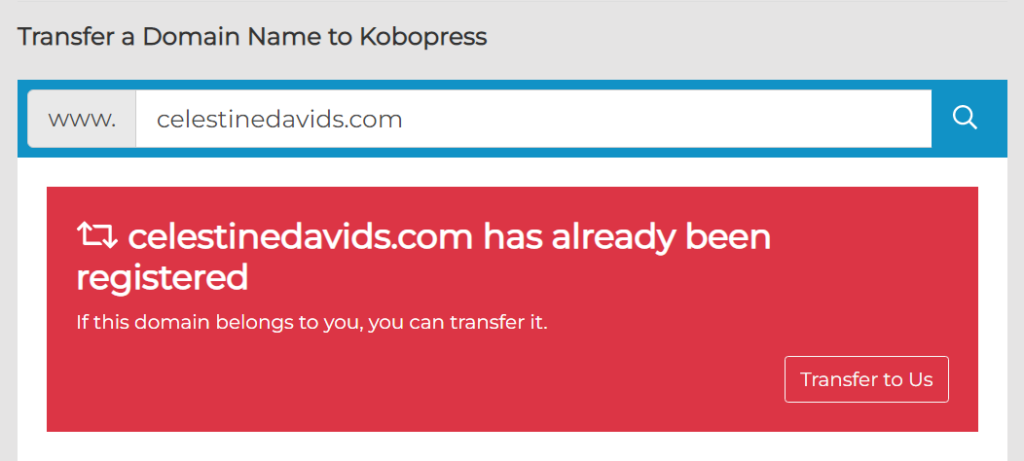
Transfer a Domain Name to Kobopress:
If you have a domain registered elsewhere (with another registrar or web hosting company), you can transfer it to us using this option:
Use an Existing Domain
Choose this option if you want to use an existing domain without transferring it to Kobopress.
Also choose this option if you want to use our temporary domain function.
If you choose this option, you will be able to build and host your website on a temporary domain that we will automatically generate for you. You can then register a domain later and connect it to your site when you’re ready.
To choose this option, just enter any domain name (e.g. yournewdomain.com) in the domain search box and click Use domain:
7. Once you’ve added a primary domain to your hosting account, it’s time to complete your order.
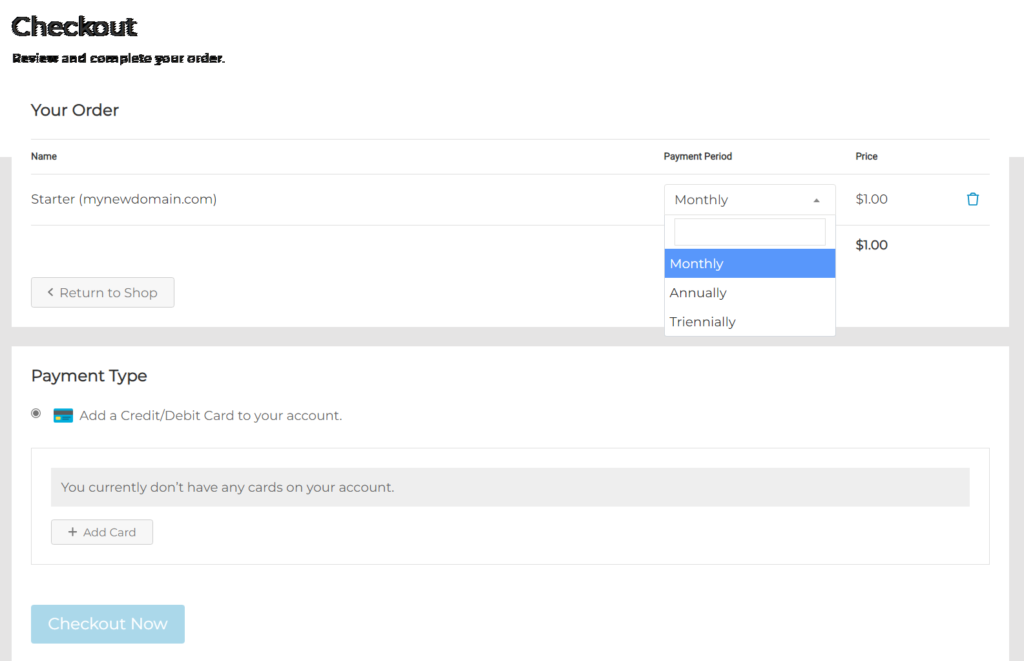
First choose a payment period/billing cycle – whether you want to pay monthly ($1 every month), annually ($12 every year) or triennially ($36 every 3 years).
Under Payment Type, click Add Card button to securely add a credit or debit card and proceed with your order. Our payments are powered by Stripe and Paystack.
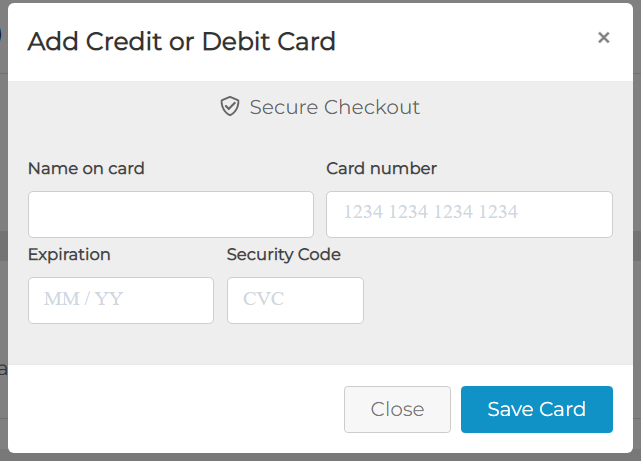
Be sure to enter the correct card details. Note that Security Code (CVC) is the 3-digit number at the back of your credit/debit card.
Once you’ve entered your card details, click Save Card.
Next, select the card you’ve just added and click Checkout Now.
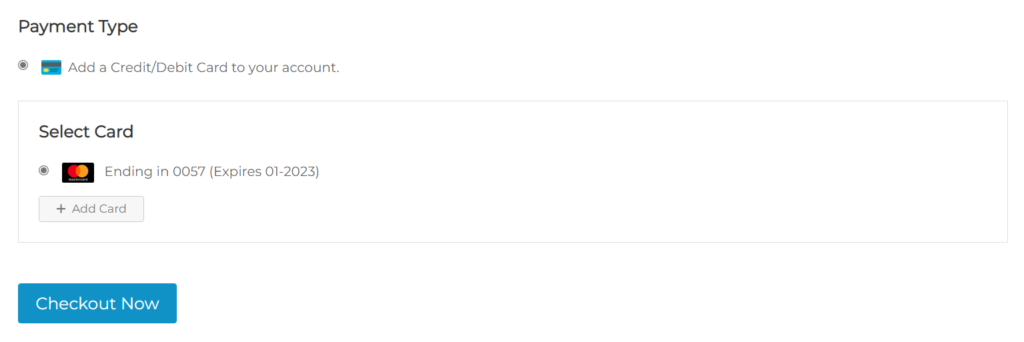
Once your payment is successful, you should receive an invoice for your purchase via email, with additional details regarding your Kobopress hosting account.
Now your hosting account has been fully configured. But before you do anything else, it’s time to show you around your client area.
Your Client Area
Your client area is where you can manage all your hosting services and account. To access your client area, you need to login to your Kobopress hosting control panel:
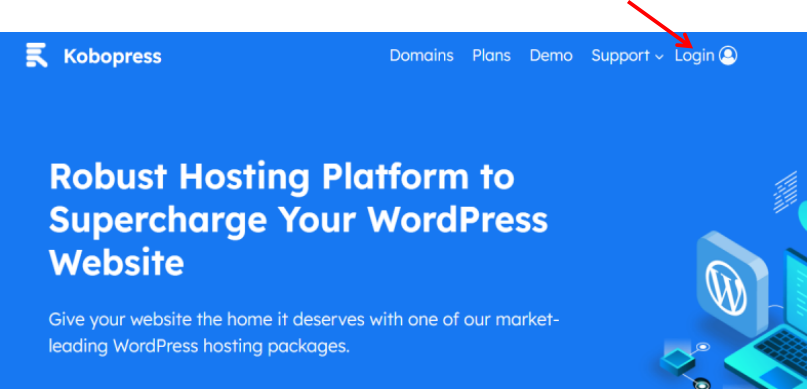
1. Visit kobopress.com or my.kobopress.com and click the Login or Sign In button.
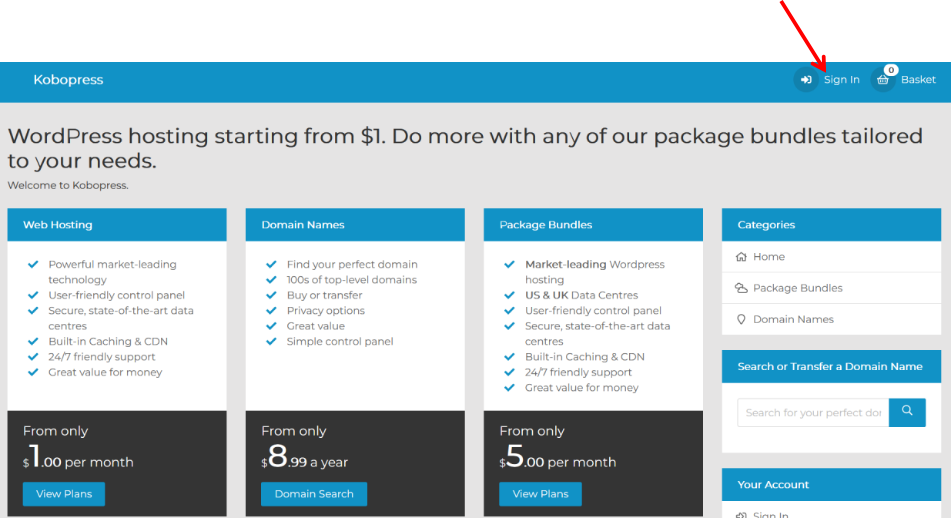
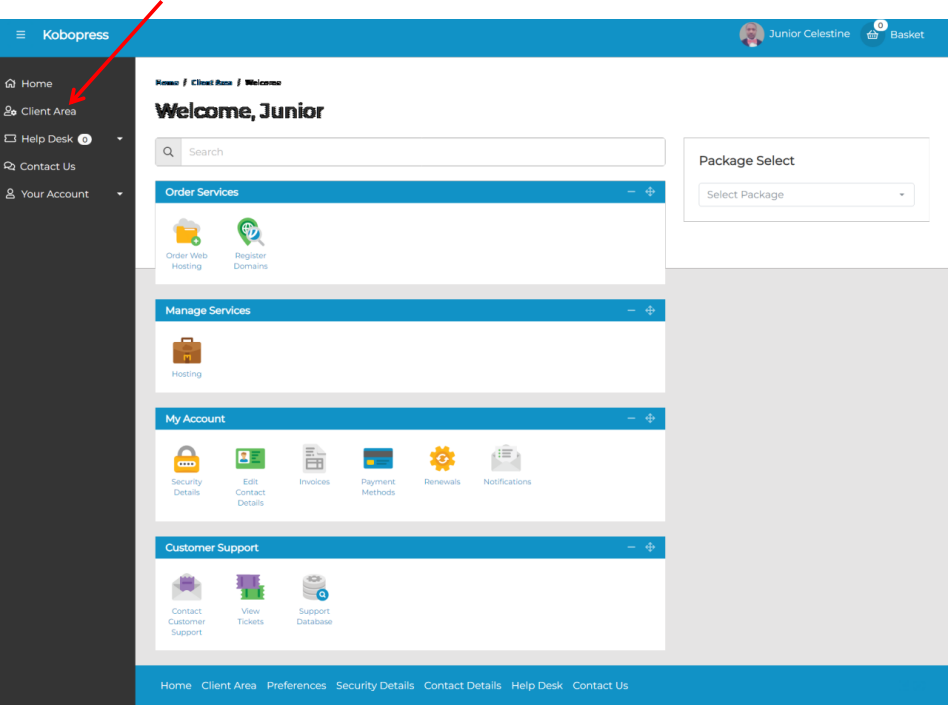
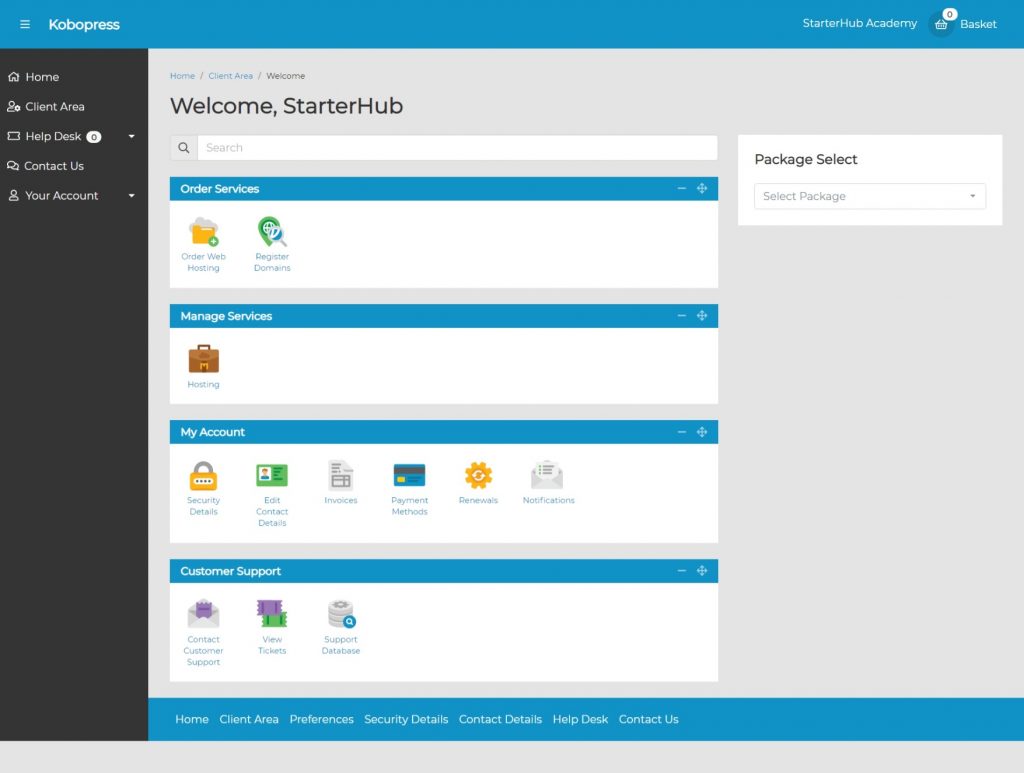
2. Once you’re signed in, click Client Area, and you will see all available services grouped under: Order Services, Manage Services, My Account and Customer Support:
Managing Your Hosting Package
When you create a hosting package, you will be able to manage it right from your Kobopress control panel interface.
Here, you will have access to tools that will enable you do things like installing and managing your WordPress application, installing or activating SSL certificate, taking backups, managing website files, emails, domains, website optimisation, PHP and CDN settings, etc.
Follow these simple steps whenever you want to manage your hosting packages:
1. Click Client Area from your Kobopress Control Panel: https://my.kobopress.com/manage
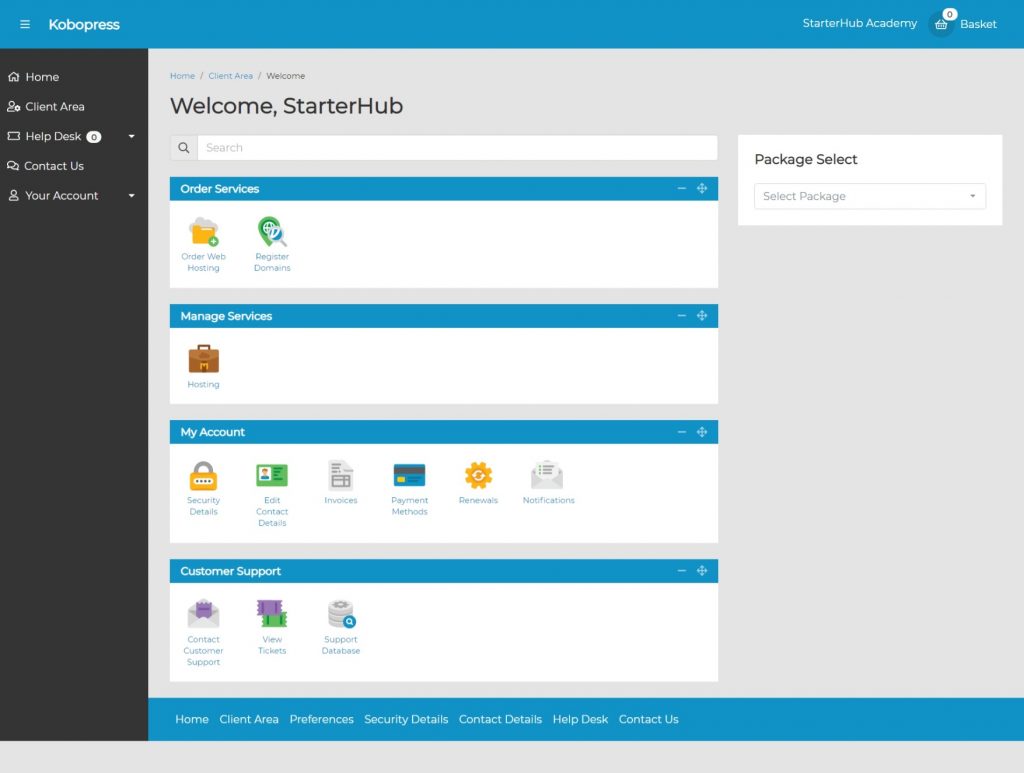
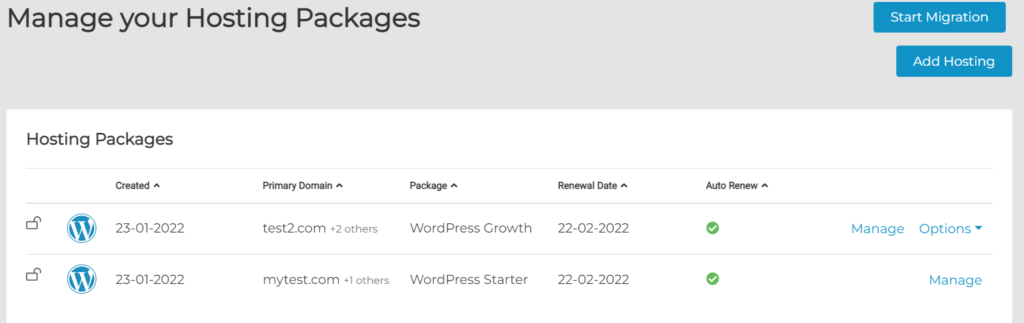
2. Click the Hosting icon under Manage Services, and choose Manage on the package you want to manage:
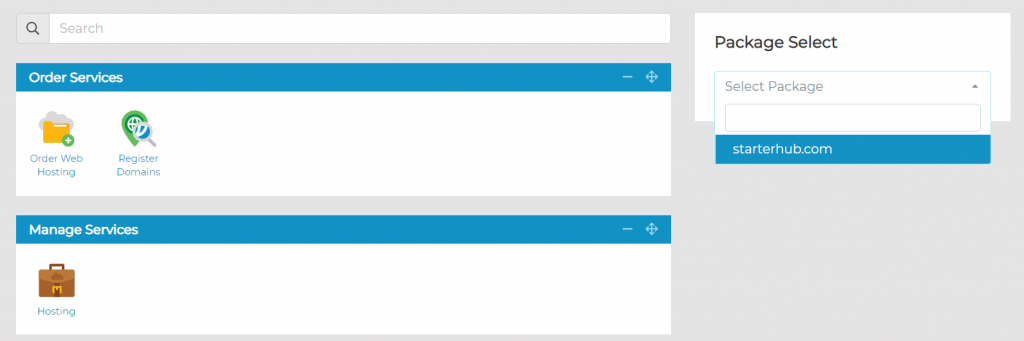
Alternatively, you can directly select the domain from Package Select (right sidebar):
3. A list of services you can configure on your app (domain) will be displayed, grouped under different categories:
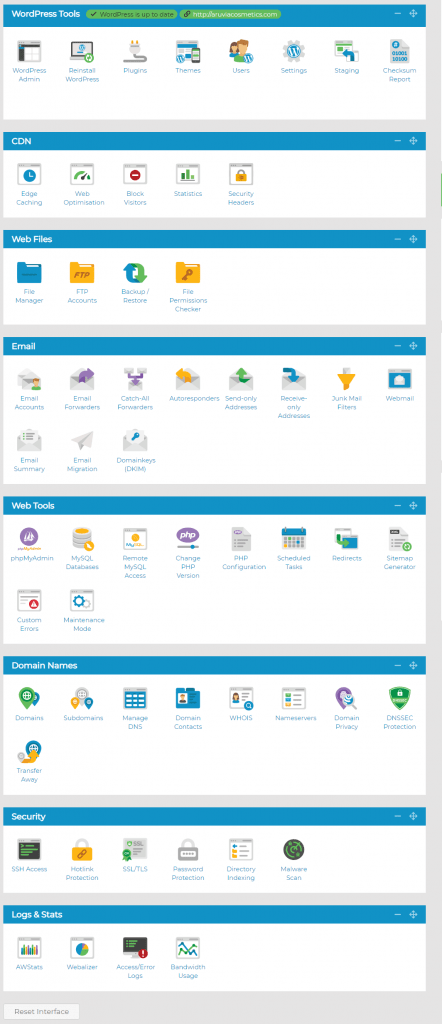
4. That’s it. You can choose any service you want to apply by clicking on it.
Installing/Activating an SSL Certificate
Before you install WordPress, it is important to first activate an SSL certificate on your domain.
Every Kobopress hosting package comes with a free wildcard SSL certificate, enabling you to use the more secure ‘HTTPS’ protocol to keep your site users secure. To activate the SSL, your domain should either be registered with us, or you’ll need to make sure you’ve pointed the domain name to our nameservers.
Note: If you’re using our temporary domain feature, you won’t be able to install an SSL certificate on it.
With that done, you need to:
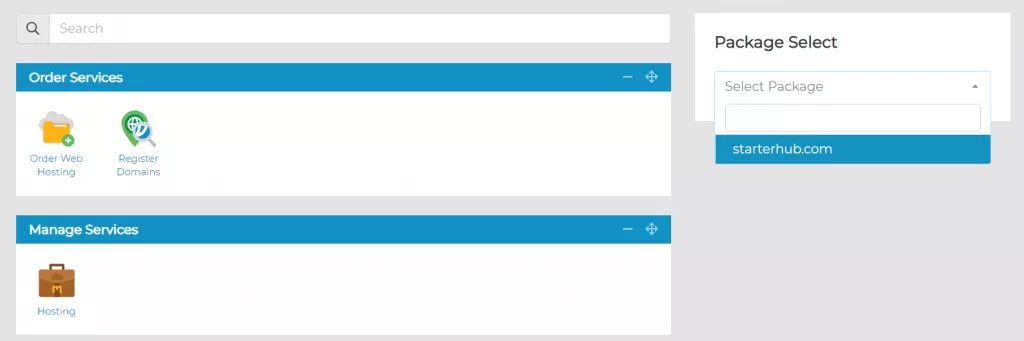
1. Visit your Client Area>Manage Services>Hosting; within Manage Hosting, select Manage on the hosting package on which you wish to activate the SSL. Or directly select the domain from Package Select (right sidebar):
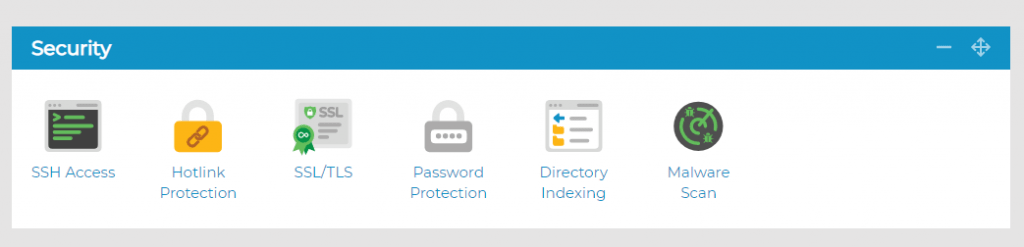
2. Under Security, click on the SSL/TLS icon
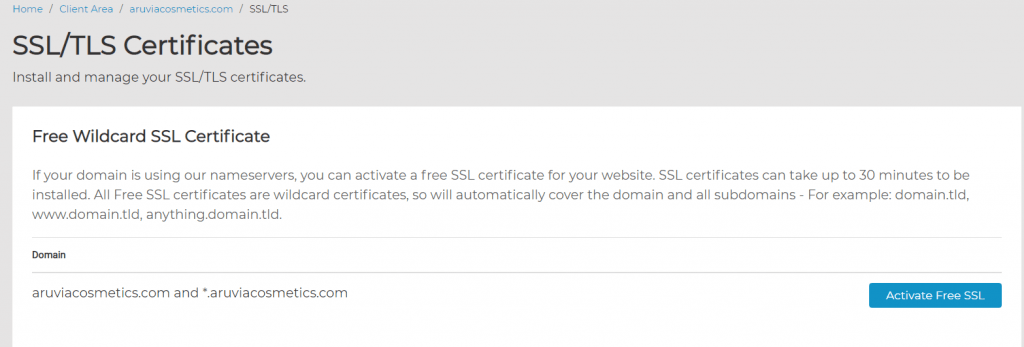
3. You will then see your domain name and an option to Activate Free SSL next to it – select this and the SSL will be applied to your domain
If you’d like all your visitors to use SSL connections (i.e. for HTTPS to always be used), simply select the Enable Forced HTTPS option at the bottom of the page:

Once the SSL Certificate has been activated, it will take up to 30 minutes to secure your website. This is due to the changes needed to be made on our load balancers.
That’s all!
Why should you use Forced HTTPS on your website?
Using HTTPS instead of HTTP means that communication between your browser and a website is encrypted via the use of an SSL (Secure Socket Layer).
Even if your website doesn’t handle sensitive data, it’s a good idea to make sure your website loads securely over HTTPS. It’s now becoming a requirement for many new browser features as well as potentially having an impact on search engine rankings.
To make sure your website loads securely, it must be prefixed with HTTPS instead of HTTP.
Installing WordPress
To install WordPress:
1. Click on Client Area from your Kobopress control panel:
2. Click Hosting under Manage Services
3. You should see the domain(s) you’ve assigned hosting package to; click Manage beside the domain you want to install WordPress on.
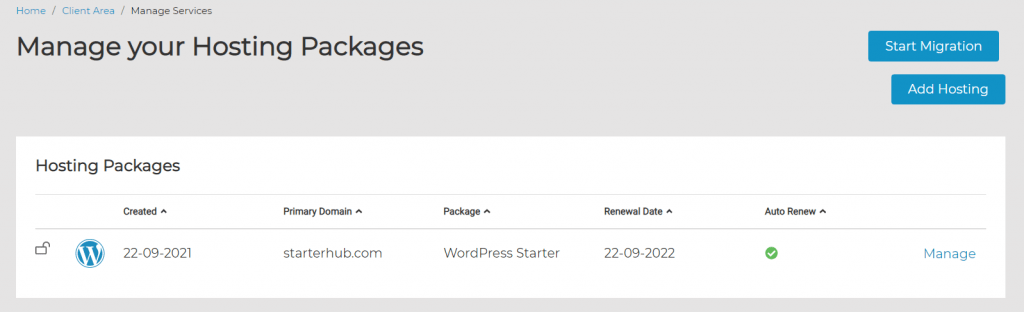
4. Click WordPress Install Wizard under WordPress Tools.
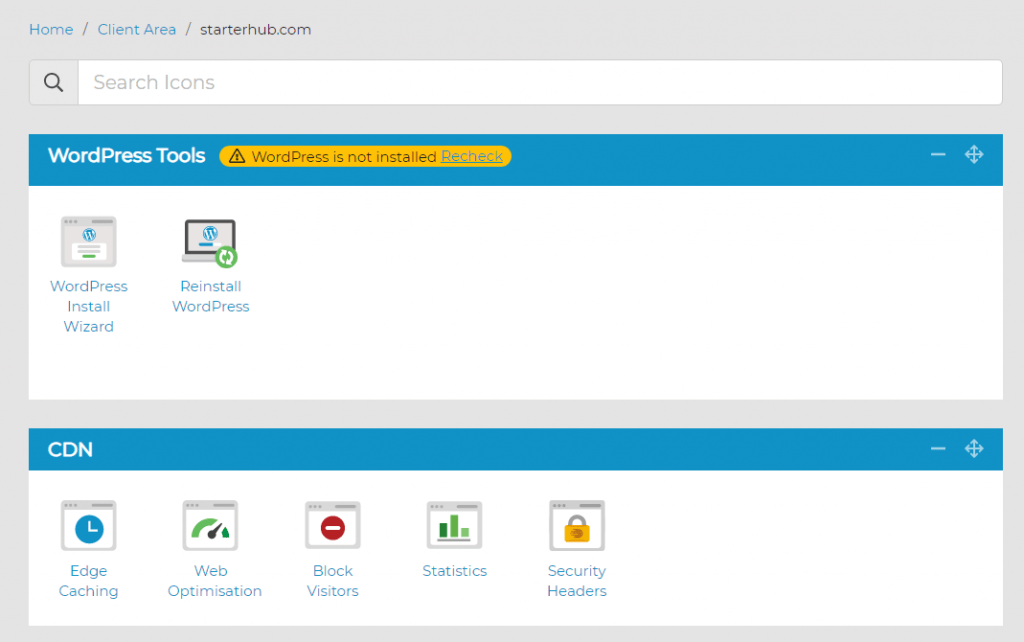
If you registered your domain with us, or you already pointed it to our servers ( ns1.stackdns.com, ns2.stackdns.com, ns3.stackdns.com, ns4.stackdns.com), you should be able to run your WordPress install on it:
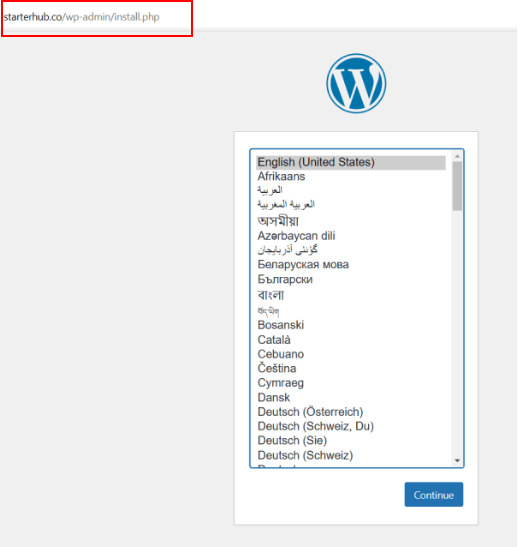
5. Follow the on-screen instructions to complete your WordPress installation:
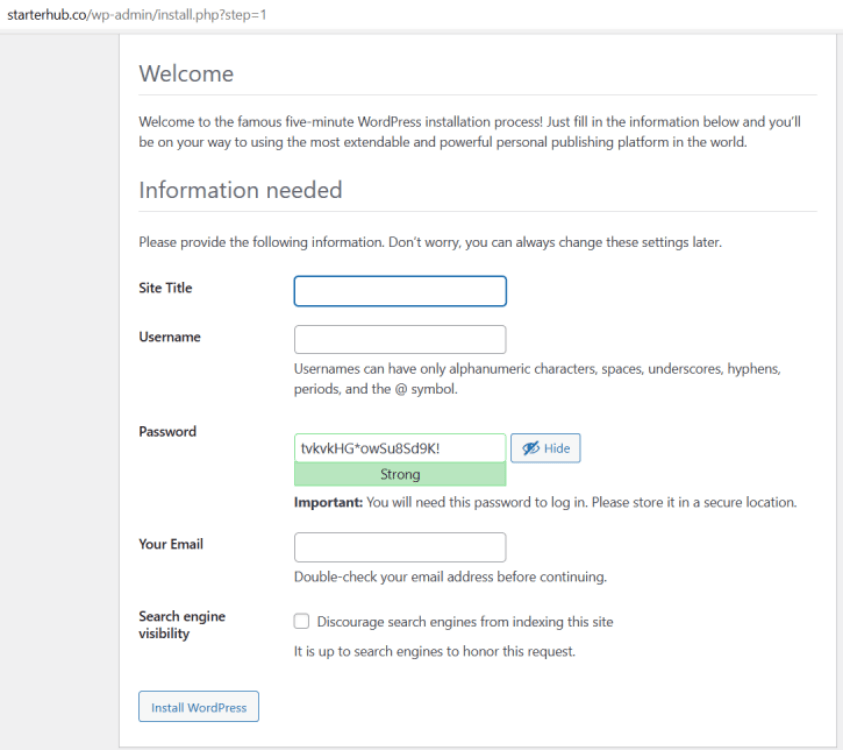
Be mindful of the credentials you choose (username, password and email address), because they will be required each time you want to log into your WordPress admin area to edit your website.
Once WordPress is installed on your domain, all WordPress Tools will become visible when you manage the package:
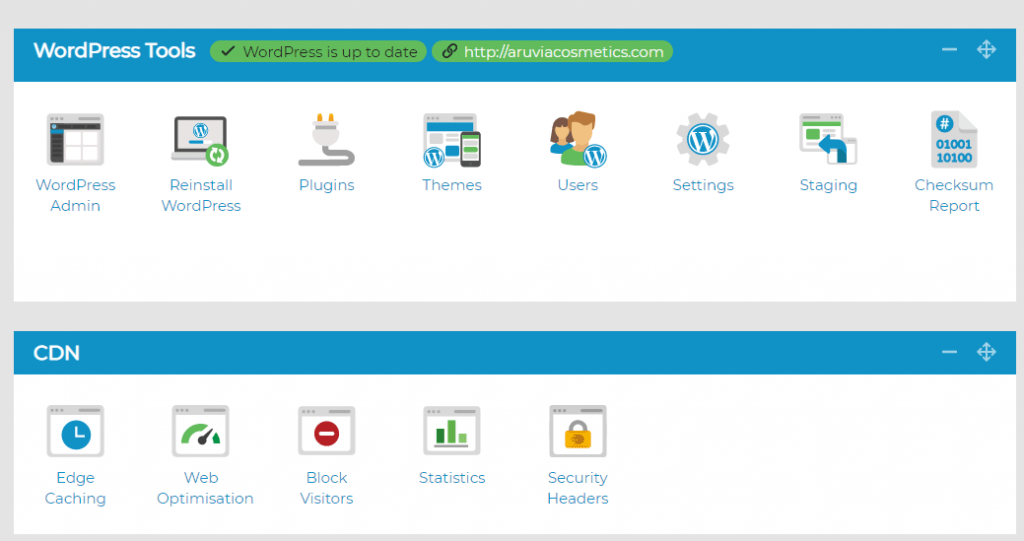
Note: If you haven’t registered a domain yet, you can still install WordPress on a temporary domain (URL) that will be automatically generated (e.g. http://domain3e2198.wpstackpress.com). You can add a permanent domain to your site later when you’re ready.
Your WordPress Admin Dashboard
For every time you want to edit your site, update it, add pages, create blog posts, upload a theme or install plugins, etc, you must login to your WordPress admin dashboard.
You can do this in two ways:
1. Enter your domain on the browser and add /wp-admin to it Example: https://celestinedavids.com/wp-admin (or http://domain3e2198.wpstackpress.com/wp-admin when using a temporary domain).
You will be required to log in with the admin username (or email) and password you set during your WordPress installation process.
2. Alternatively, you can also you can also log in to your WordPress admin dashboard from your Kobopress control panel. To do this:
i. Visit my.kobopress.com and sign in to your control panel
ii. From Client Area, click Hosting (under Manage Services); then click Manage beside the hosting package you want to log in to. Yo can also directly choose the hosting package from Package Select (right sidebar).
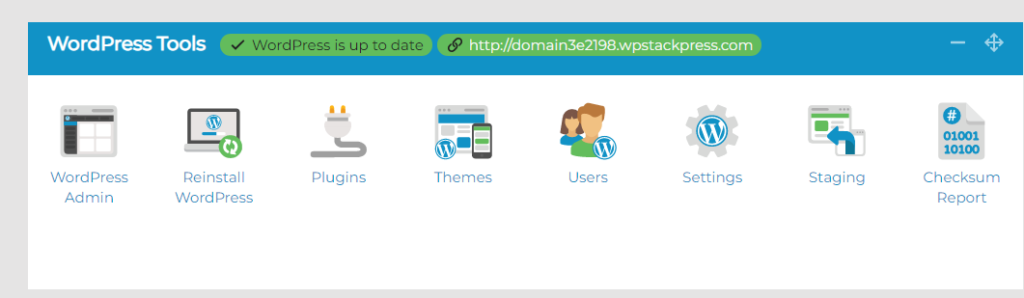
iii. Click WordPress Admin under WordPress Tools, and log in to your WordPress admin dashboard using your credentials (the ones you set during the WordPress installation process):
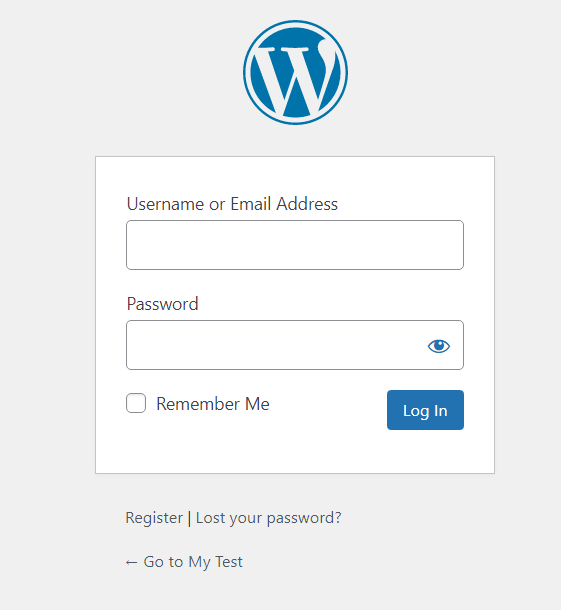
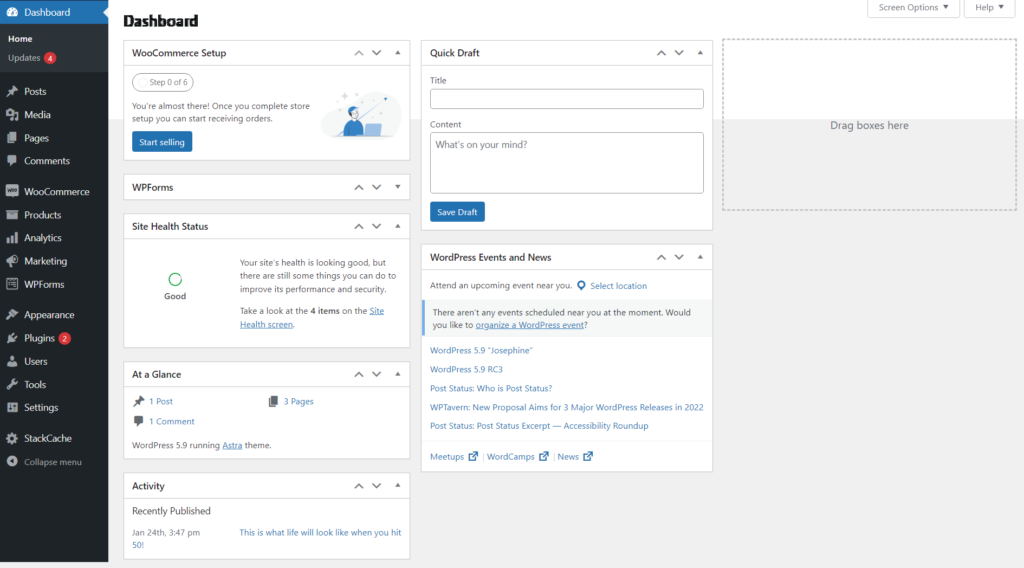
When you successfully log in to your WordPress Admin dashboard, it should look something like this:
WordPress Admin Settings
When you log in to your WordPress Admin for the first time, spare a moment to do some basic site settings before you do anything else.
There are a number of settings you can do, but for now we are only going to be concerned with a few settings under General, Discussion and Permalinks.
General Settings
1. Point to Settings from your WordPress Dashboard menu and click General
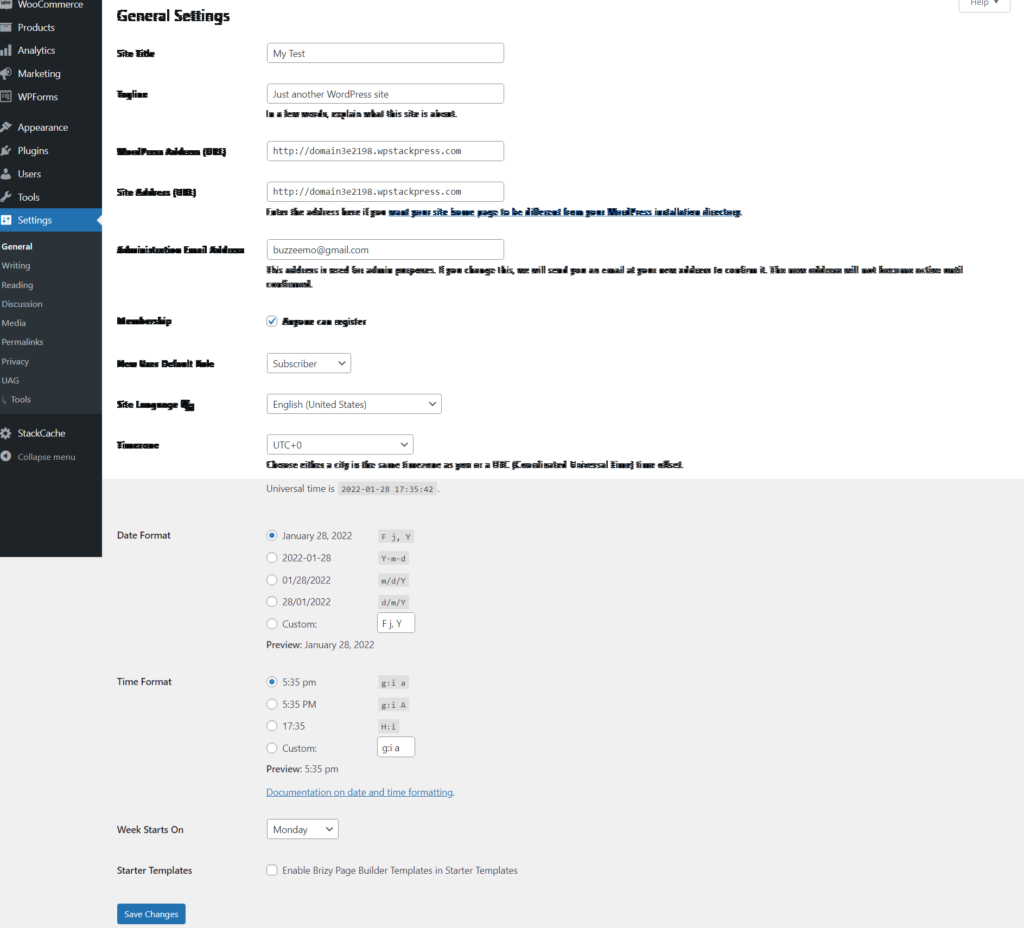
Here, there are a number of settings you can do such as changing your Site Title and Tag line, Admin email, etc.
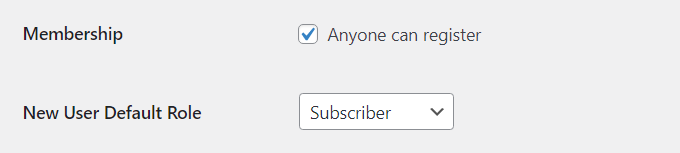
2. But most importantly, scroll down to Membership and make sure Anyone can register is ticked/selected and New User Default Role is set to Subscriber.
You can also choose your preferred date and time format if you want, otherwise leave everything else as it is by default and click Save Changes.
Discussion Settings
The next settings you must adjust are the Discussion settings.
Point to Settings from your dashboard menu and click Discussion.
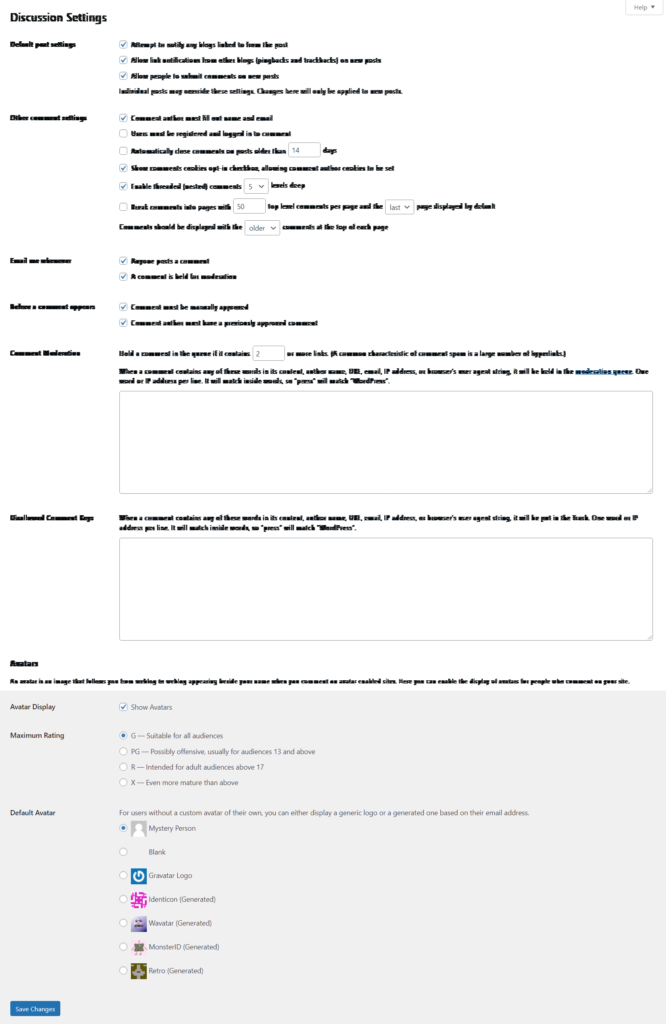
Here, you can set how you want comments to be handled on moderated on your site. This is very important to avoid spam comments flooding your posts.
You may also choose an avatar (a display picture for comment authors).
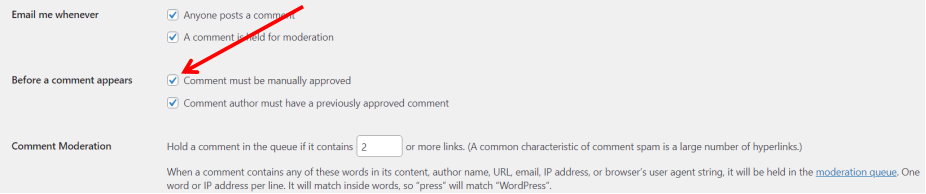
Perhaps, the most important setting here is to set your comments to manual approval by ticking the checkbox (Comment must be manually approved):
Once you’re done with your settings, click Save Changes at the bottom of your screen.
Permalink Settings
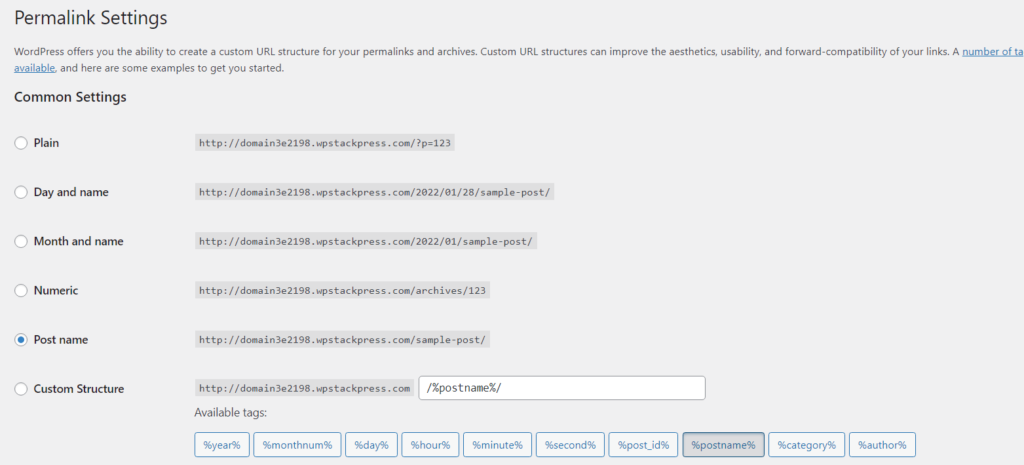
Permalink is the full URL you see – and use – for any given post, page or other pieces of content on your site. It’s a permanent link, hence the name permalink. It could include your domain name (e.g. https://kobopress.com) plus what’s called a slug, i.e the piece of the URL that comes after the domain name. This might include a date or a category or anything you please. A simple permalink makes a URL easy to understand and share (e.g. For instance, the permalink of this post is https://kobopress.com/create-website-with-wordpress).
Permalinks should be SEO-friendly
Permalinks are an important part of your site as both search engines and visitors use these URLs to index and visit your site. The type of permalink you pick influences the way these two parties see and value your site. A URL with a load of incomprehensible gibberish at the end is a lot less shareable and enticing than a short and simple SEO-friendly URL. An example permalink could be:
https://kobopress.com/category/post-nameIt could also be something like:
https://kobopress.com/10/10/2021/post-nameor
https://kobopress.com/post-nameBy default, WordPress uses a permalink structure that’s not SEO-friendly. These look something like this:
https://kobopress.com/?p=39811The number you see up there is the ID WordPress had in mind for this particular article. It’s page number 39811 in the database of this site. While Google still understands the content on that page, a URL like this does nothing for your SEO. It does not describe what kind of content the page offers and it’s not something that users are inclined to share. And did we mention that it’s not very professional looking? If your URL contains relevant words, this provides users and search engines with more information about the page than any ID or parameter would.
Considerations for your permalinks
Make sure you pick a permalink structure that fits your goals. If you have a news site, it might make sense to add the publication date of the article to the URL (by choosing Month and name). If, however, you are planning to write killer cornerstone content that has to stand the test of time, it’s not recommended to use a date in the URL as this could make the content look ‘old’.
We recommend using a simple and clear permalink structure. For most sites, it makes sense to append the post name to the domain name. So in WordPress that would be the /postname/ option (Choose Post name option).
Always pick your permalink structure wisely. Don’t change this structure for the sake of it. Incorrectly redirecting your old URLs to the new URLs might lead to problems and could get you dropped from search engine rankings. Please think about your permalink structure before launching your site.
Installing a Theme
A theme is what determines the look and feel (or appearance) of your website. You can choose a theme to install from the thousands available in the WordPress repository. Or you can upload a theme that you downloaded from a third-party marketplace like Themeforest.
For the purpose of this tutorial, we will be installing the Astra theme from the WordPress repository.
To install a WordPress theme:
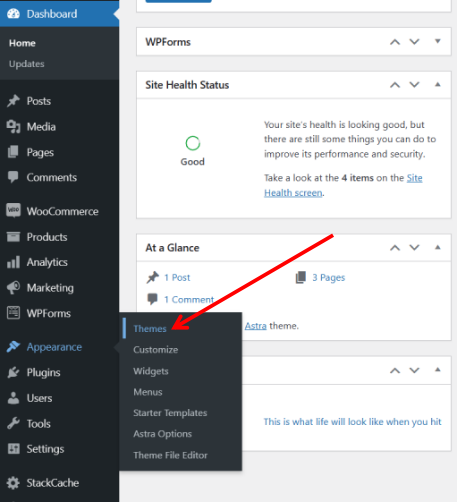
1. Point to Appearance from your WordPress dashboard menu and click Themes
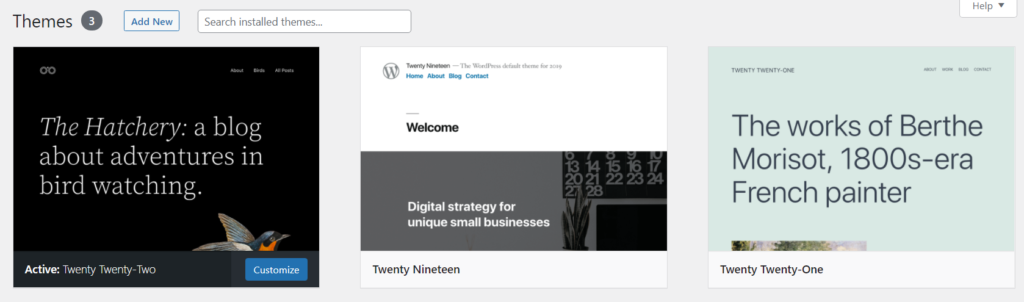
You should see the default WordPress themes that are pre-installed with your WordPress installation:
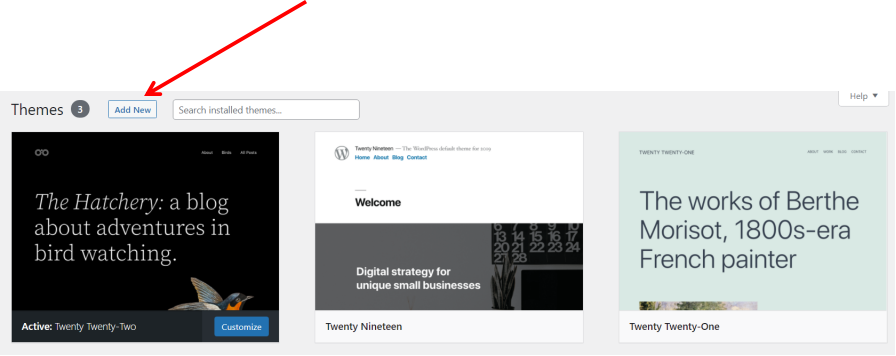
2. Click Add New button at the top
3. Install the theme you want (in this case, Astra) by clicking the Install button below the theme thumbnail:
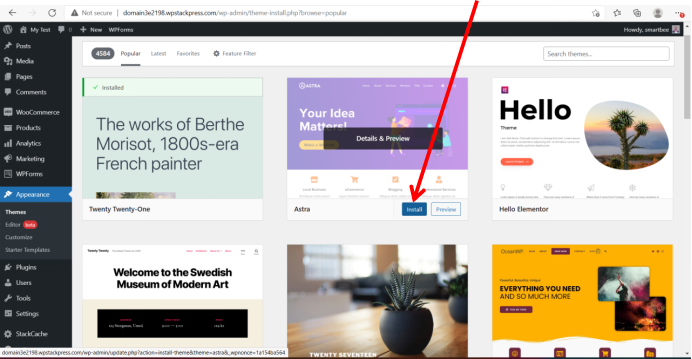
4. Once your theme is installed, click Activate button:
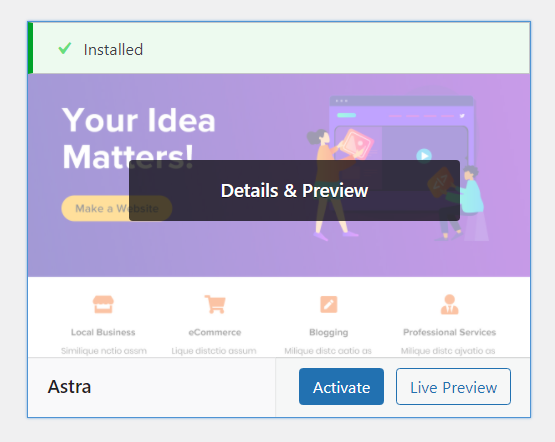
5. When you install and activate the Astra WordPress theme, you’ll be prompted to install the Astra Starter Templates plugin. Click Get Started button:

(Starter templates are ready-made website templates that you can import in one click and edit as you deem fit).
6. Your Astra Start Templates plugin will be installed and activated. Now click Build Your Website Now Button:
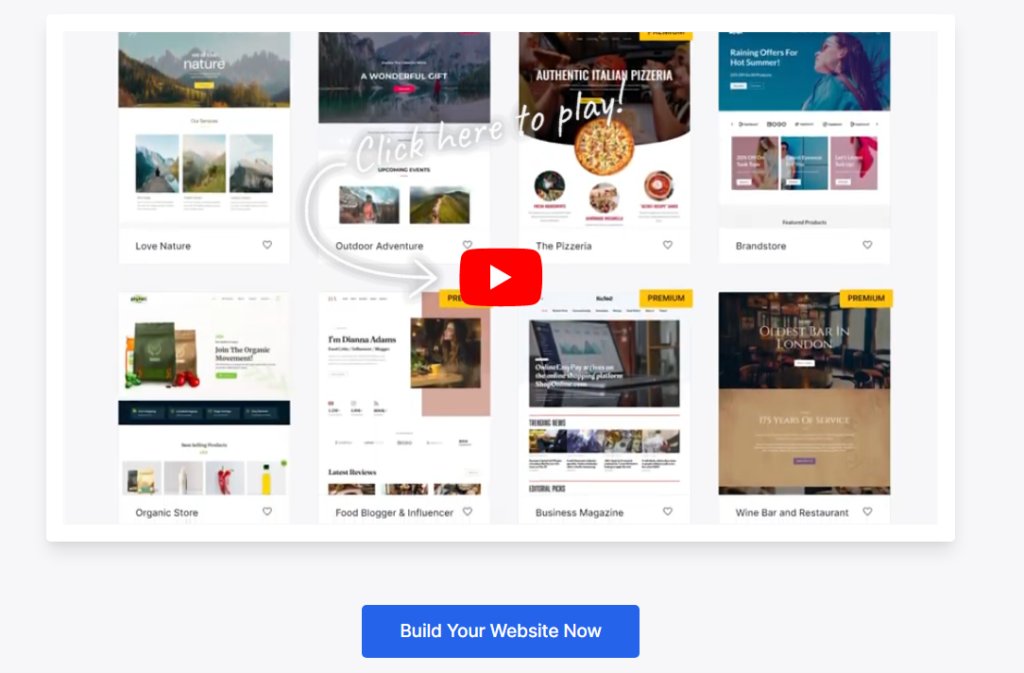
7. Choose your page builder. For the purpose of this tutorial, we will go with the default WordPress Block Editor (Gutenberg).
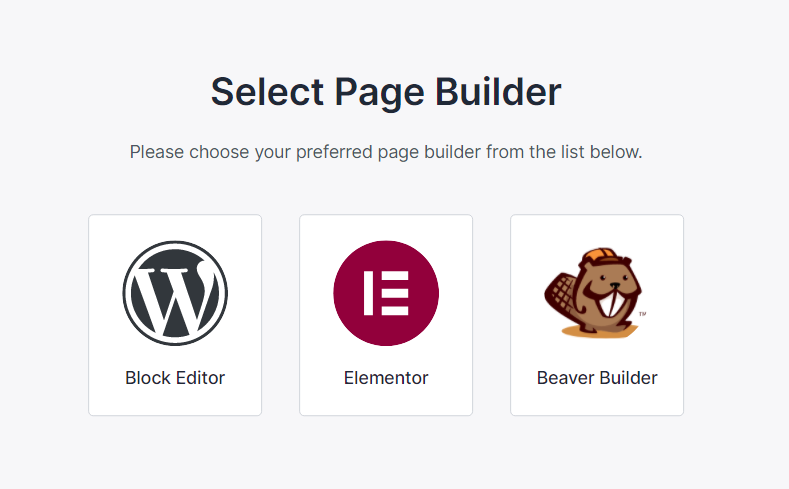
8. Once you choose your preferred page builder (Block Editor), you will see a list of available templates to import:
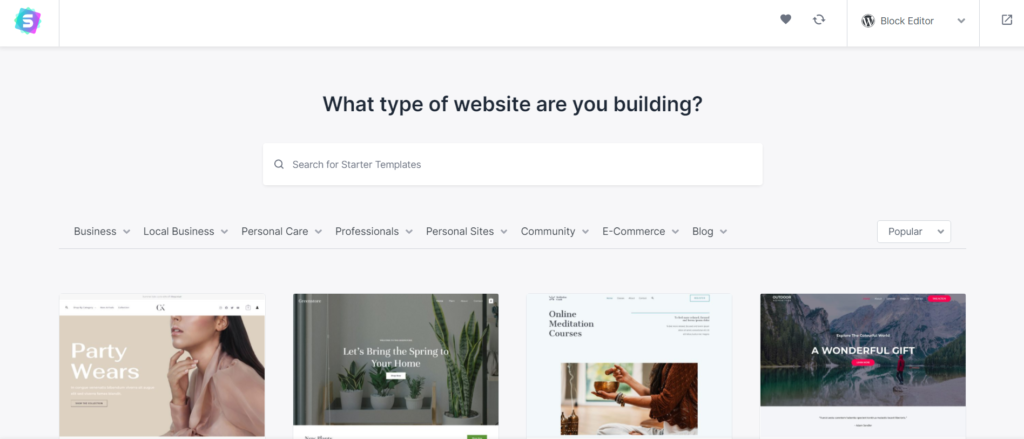
Click on any one of your choice to continue. Remember, the design you choose should reflect the kind of website you want to build:

9. You may start branding your website here by uploading a logo, but click Skip & Continue (you will upload your logo later).
10. You may choose your preferred color scheme and typography (font family), or just leave the default colors and fonts and click Continue.
11. On the next screen, you don’t need to do anything. Just click Submit & Build My Website.
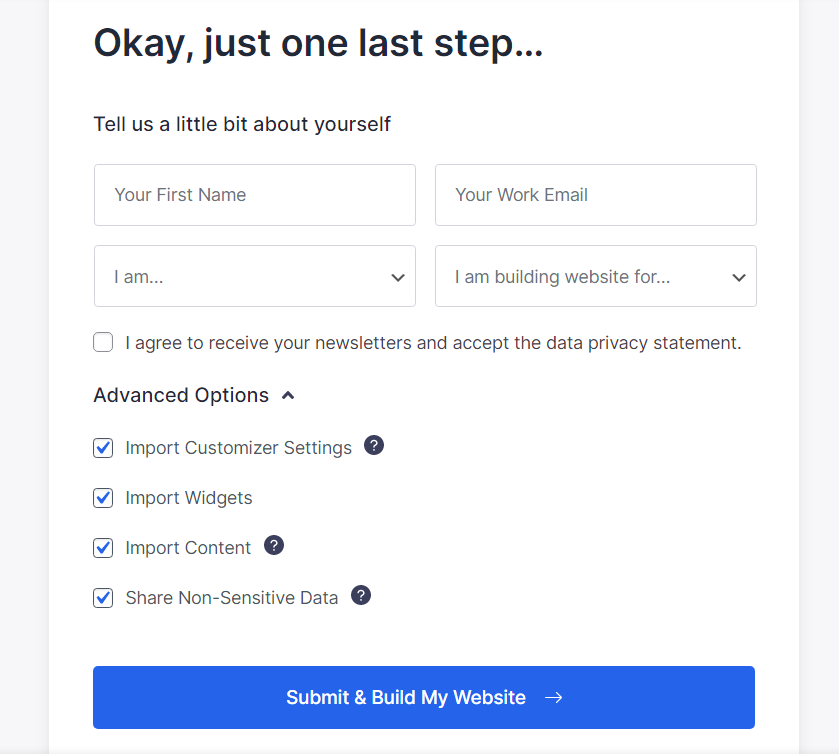
12. Your template will be imported in a few seconds, and you should see a screen that looks like this:
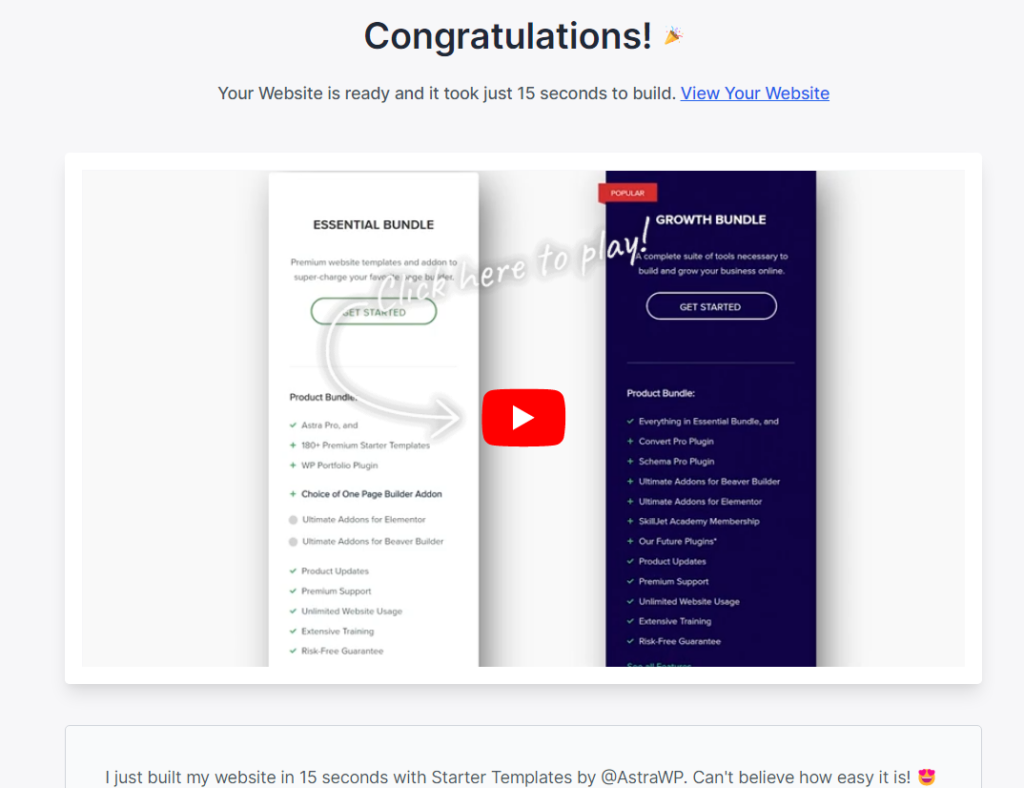
13. Click View Your Website to see how it looks:

14. Go back to your WordPress dashboard by clicking the exit button on the template import window:
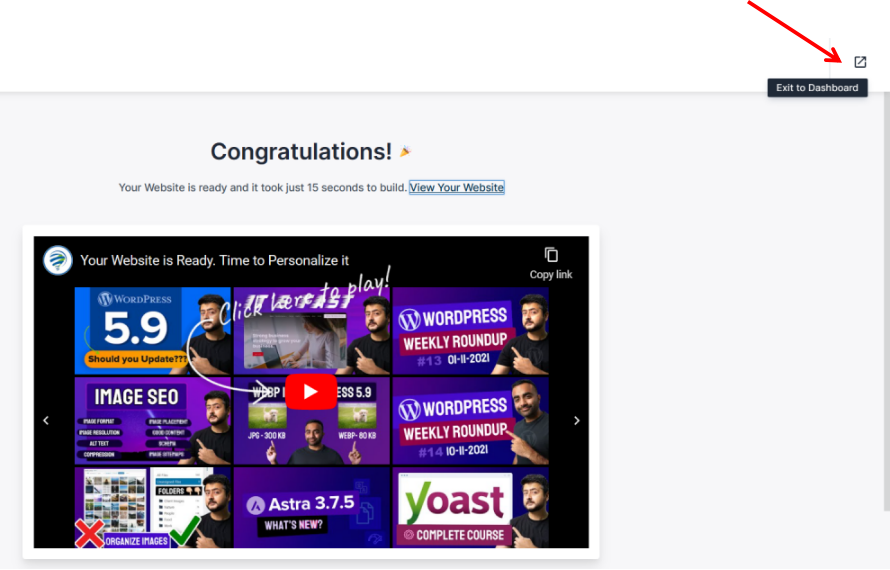
That’s that! You’ve just created a responsive website with WordPress powered by an Astra starter template.